

Soon after arriving to the US, I was given an awesome opportunity to photograph a live performance of the Stax Music Academy Alumni Band at B.B King's on world-famous Beale Street in Memphis.
Read More
Industrial Woman Shaman Photoshoot
If you follow my blog, you already know I've moved from Belgium to the US. Although I was very busy organizing the move, I had time for my last photo shoot in Belgium on the theme of 'contemporary woman shaman'.

woman shaman
Justyna Kuklo, who is a designer and a make-up artist, contacted me with her ideas for the woman shaman theme. We were very lucky to get the industrial site for the photo shoot. In fact, we ended-up having 2 slightly different shoots on the same day, but both on the theme of the contemporary woman shaman.
woman shaman
I have to admit that the pictures from the second shoot (in this blog post) are my favorite.
Make-up: Justyna Kuklo Model: Viktoria Bocevska Assistant: Jav Luc

ANNOUNCEMENT! Konrad moves to the US!
Well, what can I say more? :) I've been given an opportunity to move to the US, where I'll be working on some new and exciting personal photography projects. This unique and once in a lifetime opportunity came quite fast and unexpected. It took me some time to take my decision but there you go: I'm moving to the US! The move will be very soon because if everything goes according to the plan, I'll touch the US soil already at the beginning of June (yes, next month!).
The US Photography Projects
I don't know yet what my photography projects will be in the US. It's something I have to decide on quite soon. For sure, they will involve traveling, people and culture. I decided to drop studio photography and focus on outdoor and on-location photography. I really enjoy putting a subject in a unique and special environment and combining natural and artificial light. There is also a certain degree of unpredictability when shooting outdoor (changing light, environment, etc.), which makes it so exciting for me.
Follow me in the US
If you've been following my website/blog and my Facebook, Twitter and/or G+ accounts, not much will change. The website and the blog's addresses will stay. I might create an additional website (or two) that will focus on my photography projects.

Aokatec AK-TTL Speedlight/Flash Trigger Review
Most of you heard of speedlight (flash) TTL triggers from PocketWizzard, Phottix and Pixel King. But I'm pretty sure that the majority of you didn't know about Aokatec's TTL triggers. Aokatec, like many other similar companies, is based in China. Honestly, I didn't know about Aokatec myself until I received their first TTL flash trigger for testing, a set of AK-TTL for Nikon. If you have been considering a TTL trigger from Aokatec (they have AK-TTL for Nikon, Canon, Pentax and Sony at the moment), then you might want to carefully read this short review because AK-TTL is not a typical TTL speedlight trigger and differs considerably from the TTL flash triggers currently available on the market.

Aokatec AK-TTL's Transmitter and receiver
How does the AK-TTL work with the transmitter?
The short answer is: unusually. The long answer is a bit more complex. I think the most important information for the potential buyers is that AK-TTL is very unconventional and I haven't seen a similar system on the market yet.
At first, I found the AK-TTL's way of triggering flash quite complicated, because the transmitter unit is not mounted in the camera's hot-shoe. Yes, you read it well and here is the complicated part. The transmitter doesn't obtain the TTL or triggering information from the camera's hot-shoe but from the built-in (little) flash. Therefore, you have to set up the camera's flash as a TTL off-camera trigger and pop it up. Then you place the AK-TTL's transmitter on a hot-shoe bracket.
I know that I still haven't answered the question how does it work. The Aokatec representative had to help me in solving the mystery and I was told that "when pop-up flash fires, there's an invisible electric wave around the (pop-up) flash. There's a special sensor inside AK-TTL TX (transmitter) that gathers information from electric wave. Then the TX processes the electric wave information into control signal data, and sends it to the RX (receiver)."
AK-TTL TX hot-shoe bracket and RX with IR cable
The problem I've found with the hot-shoe bracket (see picture) is that if you put it on the camera first before popping the flash up, the flash hits the bracket quite hard. I don't know if it might cause the built-in flash's plastic frame to break, but it's definitely something I would like to avoid from happening.
The Receiver - the missing hot-shoe
The AK-TTL's receiver (RX) doesn't have a hot-shoe for a an off-camera flash and I have to say that it's something I can hardly accept nowadays. So if you want to use the TTL capabilities of your camera and the off-camera flash in high-speed sync, things get a bit more complicated.
So to use the TTL, you need to take one of the cables that come in a box with AK-TTL - a cable with an IR sensor. You have to put this IR sensor (let's call it an IR transmitter) exactly where your off-camera's flash has it's IR receiver. To help you do that, Aokatec included a nice thick yellow rubber band that will hold the IR transmitter tight to your flash.

AK-TTL transmitter RX on Nikon SB-900
You have to be quite precise to match the IR transmitter to the flash's IR receiver, otherwise it won't work. Of course this adds few more steps to your workflow as well as extra cabling that you have to be careful about. For me, it's not a problem when photographing in a studio. However, I found it rather problematic when shooting on location, especially for clients, where everything has to be done quickly.
Reliability
I found the AK-TTL for Nikon to be quite reliable. The only problem I had was that there was quite a lot of interference (probably from other household devices, like WiFi) where the RX (receiver) was triggering flash, even though the camera with a transmitter (TX) were lying on my desk untouched. Changing the radio channels solved this problem.
The AK-TTL proved to be reliable outdoor. Unfortunately, I didn't have a chance to test the real maximum distance between the TX and RX (FYI: Aokatec claims that the maximum transmission distance is 110m/360ft.)
Packaging
Unfortunately, the AK-TTLs' boxes have to be improved and you have to be really careful when buying the units: there are no marks or indications whatsoever. You don't know from looking at the box whether it contains receivers and/or transmitters and for what camera manufacturer (Nikon, Canon, Sony, etc.). This is quite unusual so pay extra attention if you plan to get AK-TTL.

Aokatec AK-TTL packaging
No manual so count on yourself
I received 2 boxes of AK-TTL and unfortunately there was no manual inside. I don't think it's much of a problem because you can get it online from the manufacturer's website. If you don't print it, you will save some extra trees :) Maybe Aokatec did that on purpose.
Price
When publishing this review, you can get a set of AK-TTL (1 receiver and 1 transmitter) for Nikon, Canon, Pentax, Olympus and Sony for $109 (+ shipping and import taxes) directly from the Aokatec's online store.
Final Comments
I'll keep the final comments on AK-TTL short.
Pros: - relatively small and light units; - both the receiver and the transmitter use standard 2xAAA batteries; - quite reliable (I would give it 8/10).
Cons: - requires to use extra bracket for the transmitter that adds extra workflow and takes time to setup; - the IR cable with IR transmitter (attached to the receiver) has to be attached precisely on the speedlight's IR receiver, which often is hard to find on the speedlight - it adds extra cables and work, which I found problematic when working outdoor with a photo crew when things need to be quickly setup and ready; - no hotshoe on the receiver; - the price - looking at the pros, the cons and other alternatives on the market, the price could be a bit lower for AK-TTL.

Visual Impressions of Porto - Night Panorama Photograph
This is the third part in the photography's mini-series on Porto, Portugal I titled 'Visual Impression of Porto'. You can read and see the previous two blog articles.There is really not much to say about this Porto's night panorama photo. Some of you might be interested how I took this night panorama. The panorama you see is made out of 7 separate pictures that were stitched together in post-processing. Each picture was taken on a tripod in long exposure. Here are the Exif details: ISO 200, f/7.1, 8 sec. exposure.
The panorama by itself is quite big, actually it's huge: 15450x4093 pixels.
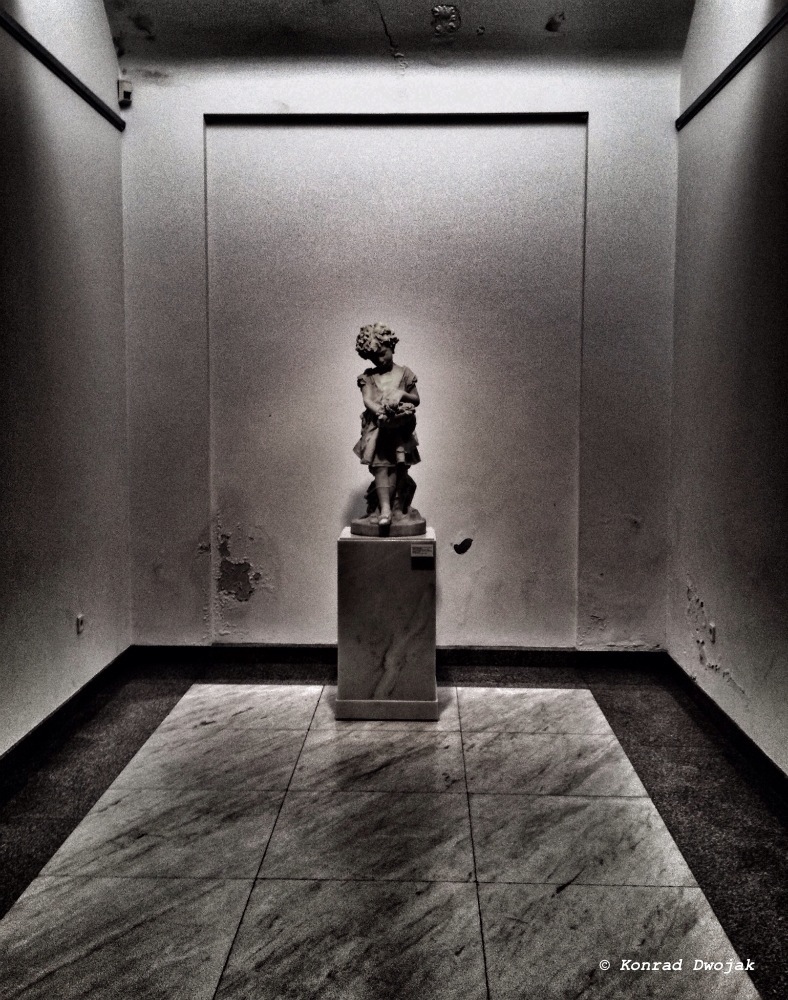
Visual Impressions of Porto - Art Museum
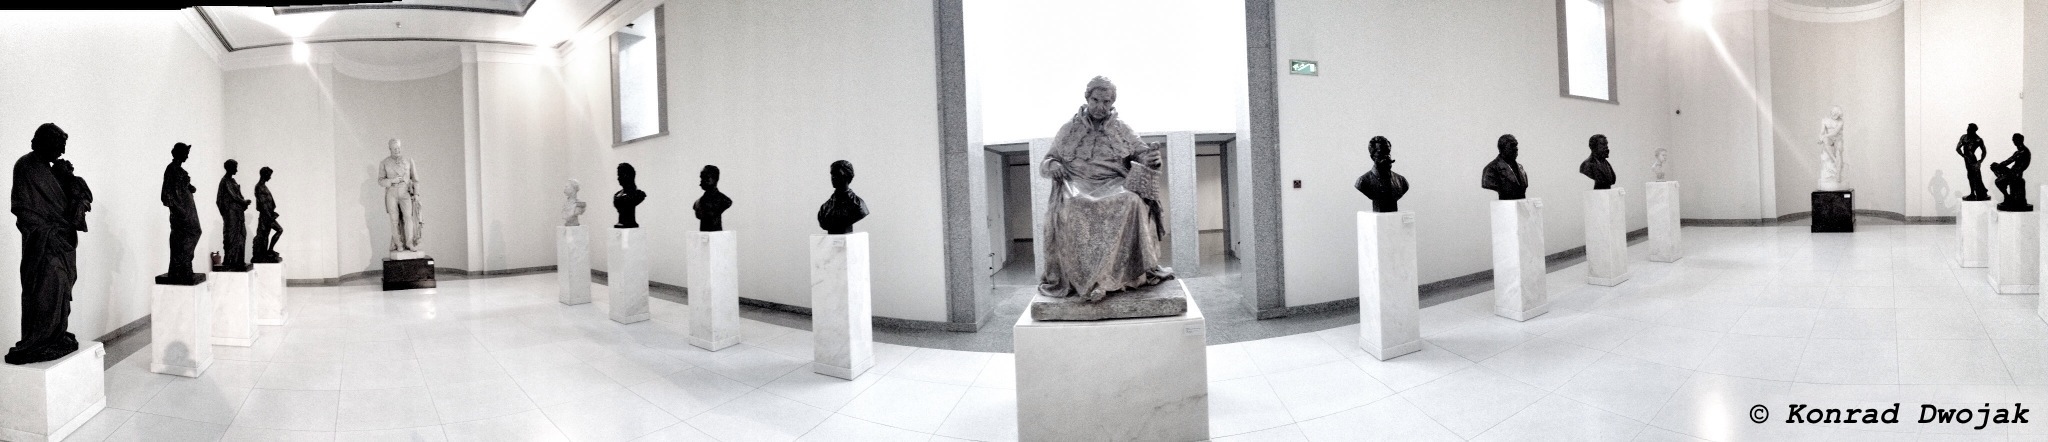
Porto Art Museum - Panorama of sculptures
When you're brainwashed with a variety of TV series, movies and pop culture, it's good visit a high culture place, like a museum, from time to time (at least, that's what my girlfriend says :) ).
The first museum that we visited (out of two, the second museum we plan to visit is a photography museum) was the Porto's Art Museum. The most interesting, in my very personal and subjective opinion, was the sculpture exhibition.

Porto Art Museum - Sculpture
FYI: All the pictures were taken with an iPhone and edited on an iPad.
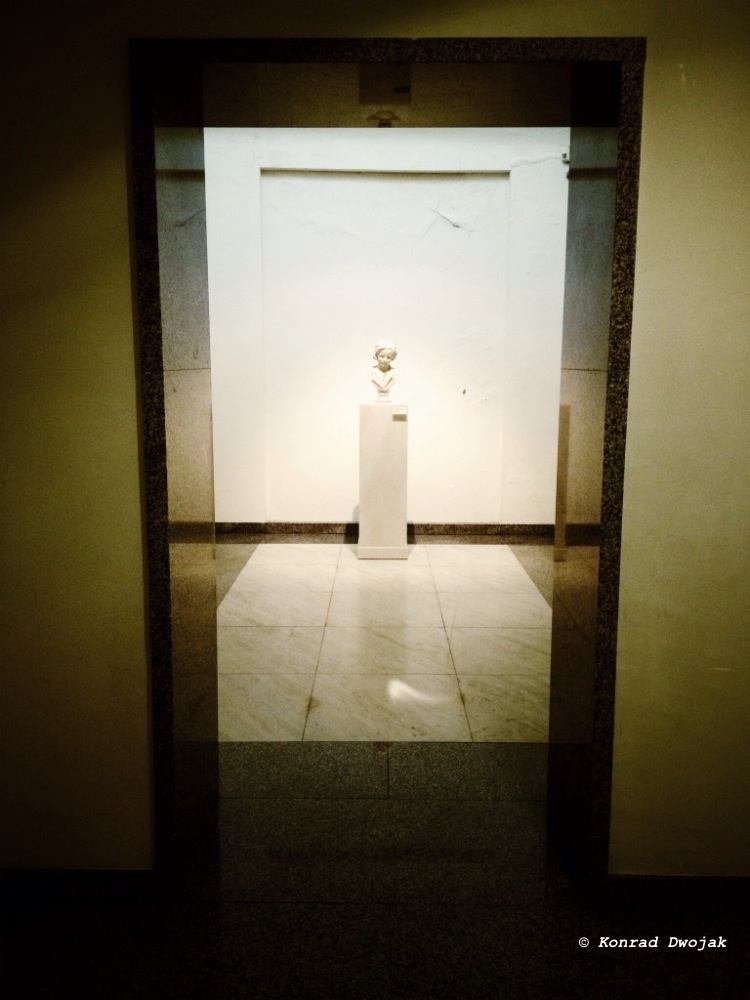
Porto Art Museum - Sculpture

Visual Impressions of Porto - Abandoned Buildings
I arrived to Porto yesterday (Sunday) and I'll be spending here the whole week with a couple of planned trip to the cities nearby. I think that this short holiday is a pretty good opportunity for a little photo project. Although the weather forecast looks really bad for this week (rain every day), I came to Porto with these two things in mind:
- to shoot some night photography of Porto (yes, I dragged a sturdy[=heavy] tripod with me);
- to take a few pictures each day around a theme or something that I've noticed/discovered that struck me about Porto or Portugal.
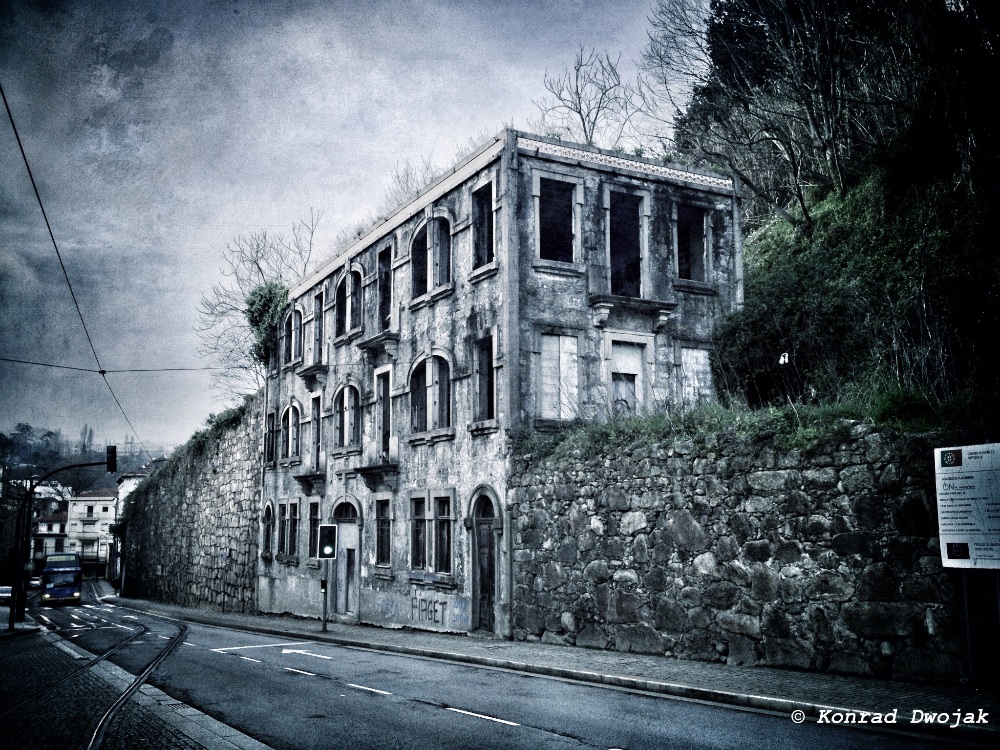
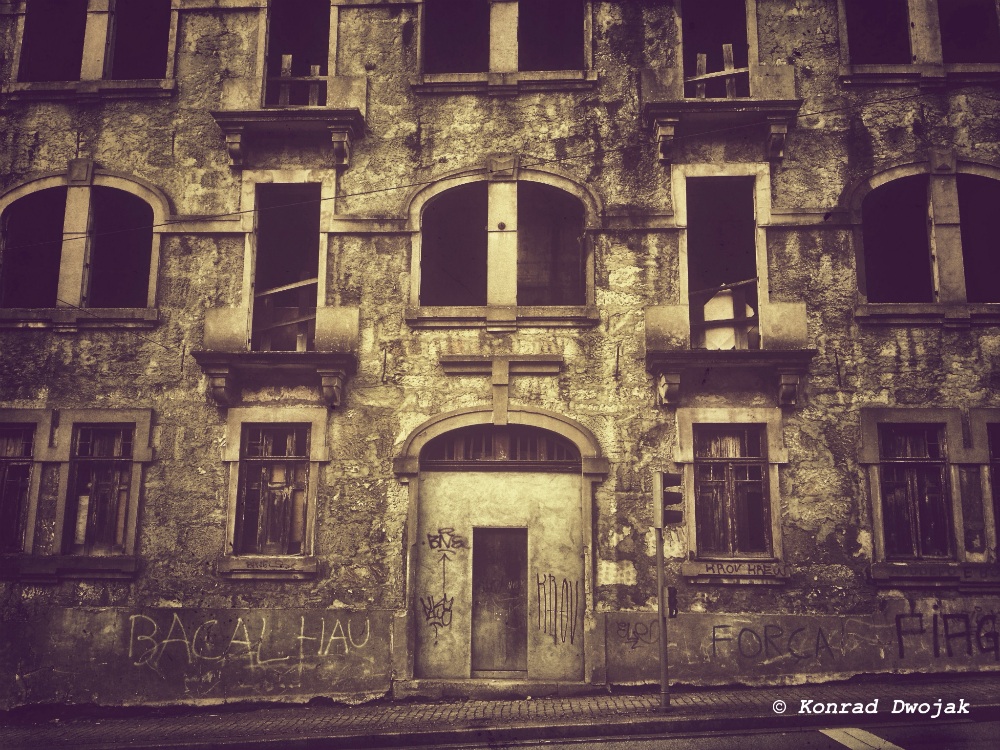
Porto's abandoned building
For the latter, I noticed that Porto has lots of abandoned buildings. Every street has at least a couple of derelict buildings that in many cases are still for sale. But I don't think that these building 'destroy' Porto's look. On the contrary, they give the city it's visual identity and ambience!
FYI: the pictures were taken with an iPhone and edited on an iPad
Porto's abandoned building

Why it's not worth buying Nikon D7100 ...
... for someone who already owns a Nikon D7000. Nikon announced last week it's new DSLR, Nikon D7100; and if you're a Nikon shooter, then this information probably doesn't come as a surprise from me now. Before the announcement, I was quite curious what D7100 will be like, most probably because I was considering buying it. I shoot cropped-sensor DX - I currently mainly use Nikon D7000, so I saw upgrading to D7100 as a natural step. However, I quickly changed my mind - I most likely won't upgrade to Nikon D7100 and here is why.
I don't want to start a war here but I don't see much of a change and upgrades between D7000 and D7100. Ok, it has a bigger sensor (24 vs 16 megapixels), bigger back monitor size (so crucial! - yes, it's sarcasm ;) ) and better movie recording. The only thing that I could see any sense in getting D7100 is that its high ISO performance is improved over D7000.
However, for me personally, it doesn't make sense in investing extra money only for slight improvement in high ISO (even though d7100 is cheaper than D7000). I have to admit that I was never in the camp of those who want 'the best & the most recent' camera. Of course, like every photographer, I'm enthusiastic about gear but I like to distinguish between what is new & cool and what I really need.
Having said that, I don't really see a need for getting D7100, especially that's I'm really happy with D7000. I might get however next update, like D7200 though. :)
That doesn't mean that my photography gear's wish list is not long. In fact, it's much longer than I can afford unfortunately. I guess I'm more of a 'light guy'. I prefer to invest in light modifiers, softboxes, strobes, upgrade wireless flash triggers, etc. Just image what lighting goodies I can get for the value of a D7100 :)

Priorities - task management for a photographer
I shared with you last week how I use Evernote for keeping track of my potential and future photo shoot locations. I also told you that I have a good but a very short memory so I need a really good way to keep and organise my to-do list. An app called 'Priorities' (from Hand Carved Code) helps me a lot in getting my head around all the tasks and things I have to do for my photography projects, my website, maintaining gear, etc. What I really like about this app is that it's really simple (so you're not distracted with unnecessary bells and whistles) but at same time it has all the functionalities that I need. To name just a few: ability to prioritise tasks and having sub-tasks, setting deadlines and reminders, integration with iOS calendar, cloud sync across all the iOS devices and the online version. The latter one, I think, is my favourite one.
Unfortunately, Priorities is currently only available on iOS devices.

Using Evernote for saving photo shoot locations
As an on-location and outdoor photographer, a good, unique and interesting photo shoot location is crucial for me. And having a good but a very short memory is definitely not helpful. That's why I always have a notebook with me where I keep all the photography notes and ideas for projects. However, it was extremely hard for me to note down a place that I just visited for a photo shoot, especially that I like to have a picture of a location at hand. I have also been using the Evernote application for few years already and it's the best note taking application for me, especially that it syncs with Evernote apps on my mobile devices (for free!). Only recently I discovered that Evernote is also awesome for saving photo shoot locations. Evernote for mobile devices will not only save automatically the GPS coordinates of a note but you can also take a picture of a photo shoot location from within the Evernote app and attach it to the note (you can also take a picture with you built-in camera application and attach it later to a note).
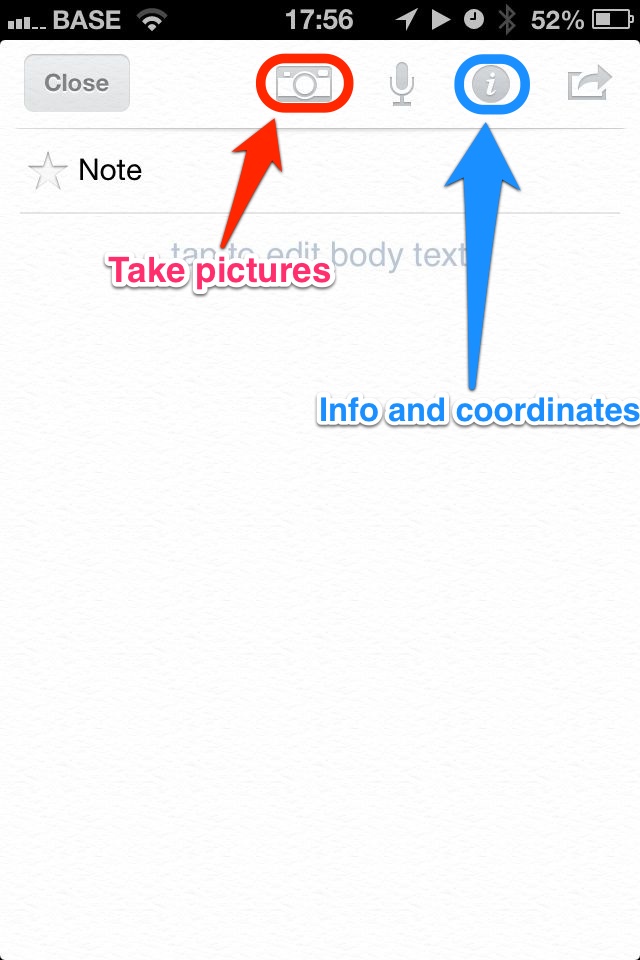
Evernote iOS for Photo Shoot Locations
I attached some screenshots for an iPhone above and below. To see the GPS coordinates where the note was taken, you have click on the 'I' icon at the top. It will open a window with all the information about the note and at the bottom you will have a map: click on the map and it will open up a native maps application where you can zoom out. You can also move the pin on the map in case Evernote did something wrong with the coordinates or if you create the note somewhere else but you attach a picture taken somewhere else. Remember that if a picture you take also has embedded GPS coordinates (well, that actually depends on your phone and the setting in your phone) so you can also take GPS coordinates from a picture.
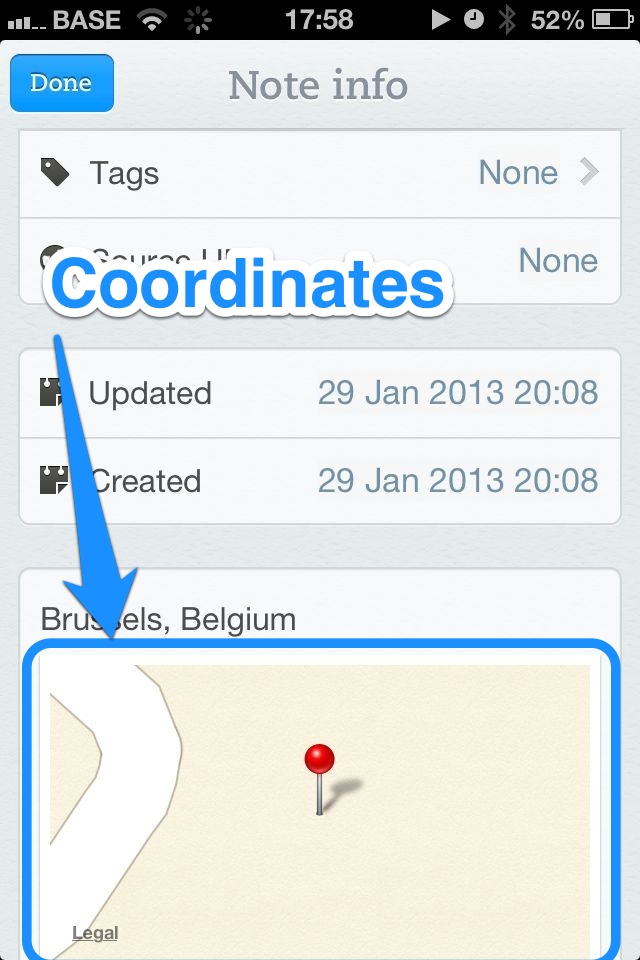
Evernote iOS Coordinates
I now have a separate Evernote notebook 'Photo Shoot Locations' where I save the potential places for the upcoming shoots. I can easily browse them on my iPad, especially when I meet with a client or with my team when we brainstorm for next photo shoot. Simple, easy and free :)